Table of contents:
Today’s post covers our most-used optical light modifier for still life shoots: the zoom spot. We’ll explain what it is, what makes it unique, and walk through a practical example from one of our recent shoots.
These modifiers seem to have fallen out of favour among photographers. Notably, no mainstream gear manufacturers currently produce them for photography, though many are made for video lighting. This is unfortunate, and we want to give this unique modifier the recognition it deserves. More importantly, we’ll explore an intriguing lighting technique that creates natural-looking light with unrivalled precision: replicating sunlight using zoom spots and mirrors to redirect the light beam.
What is a Zoom Spot?
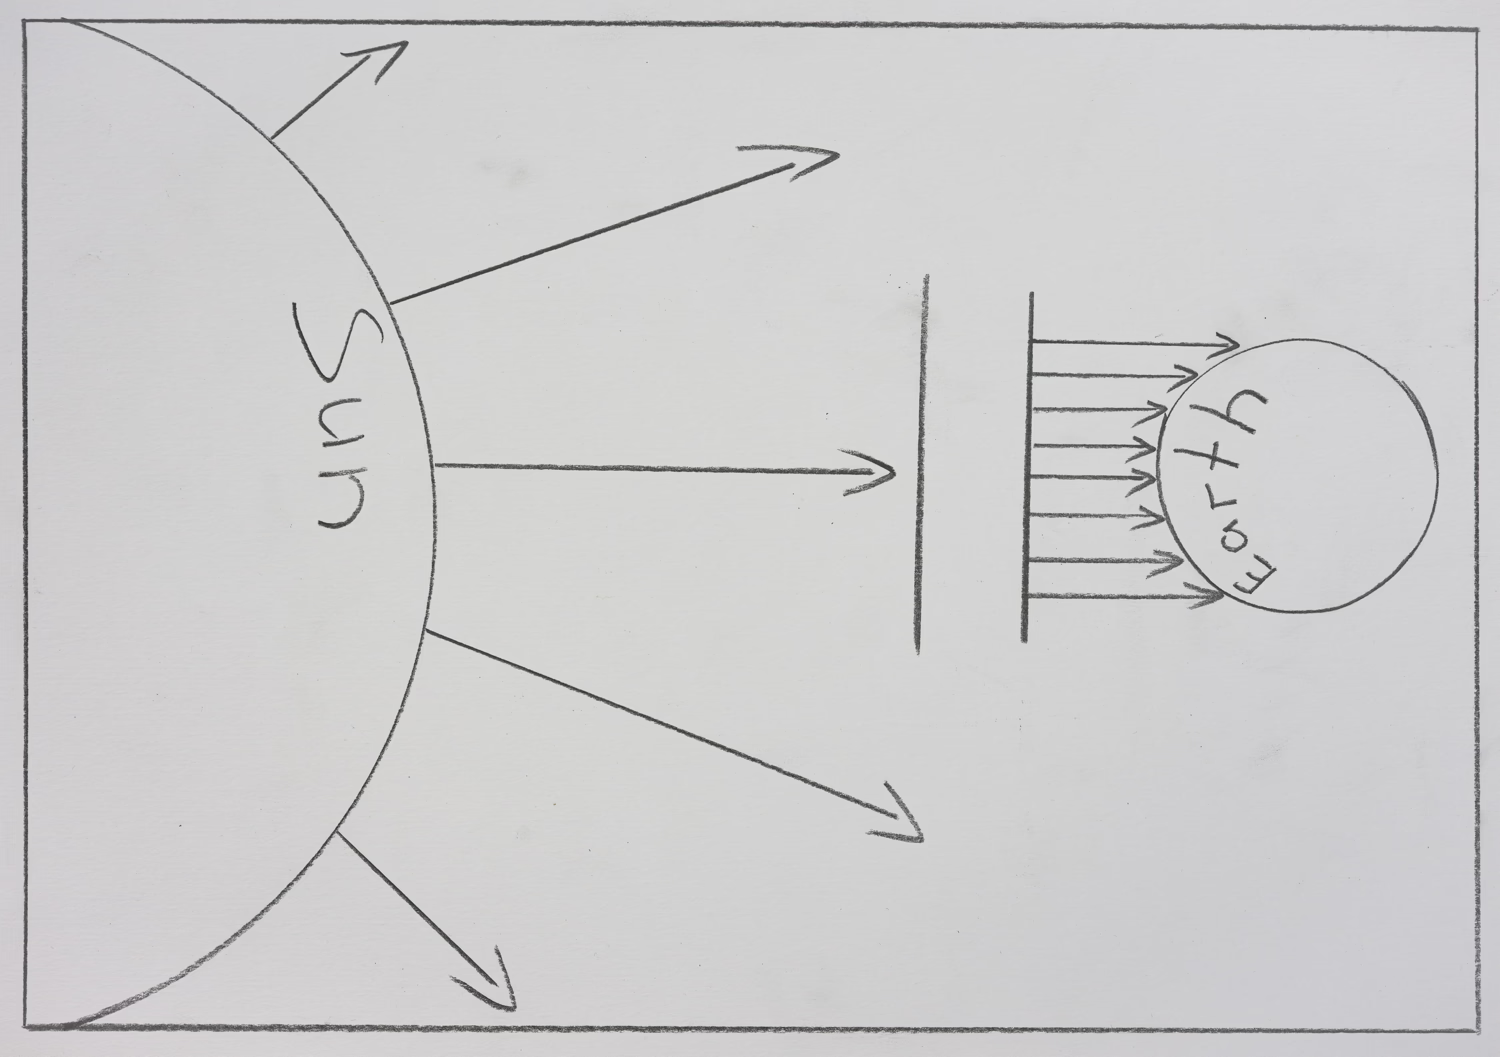
Before diving into technique, let’s clarify what a zoom spot is and how it differs from other modifiers. Few optical light modifiers exist. They all use lenses to collimate light. For a deeper explanation of why collimation matters, check our extensive “Lighting Series.” In brief: sunlight travels such a great distance that it reaches Earth in virtually parallel (collimated) rays. To recreate realistic sunlight, collimating your light source is the essential first step.
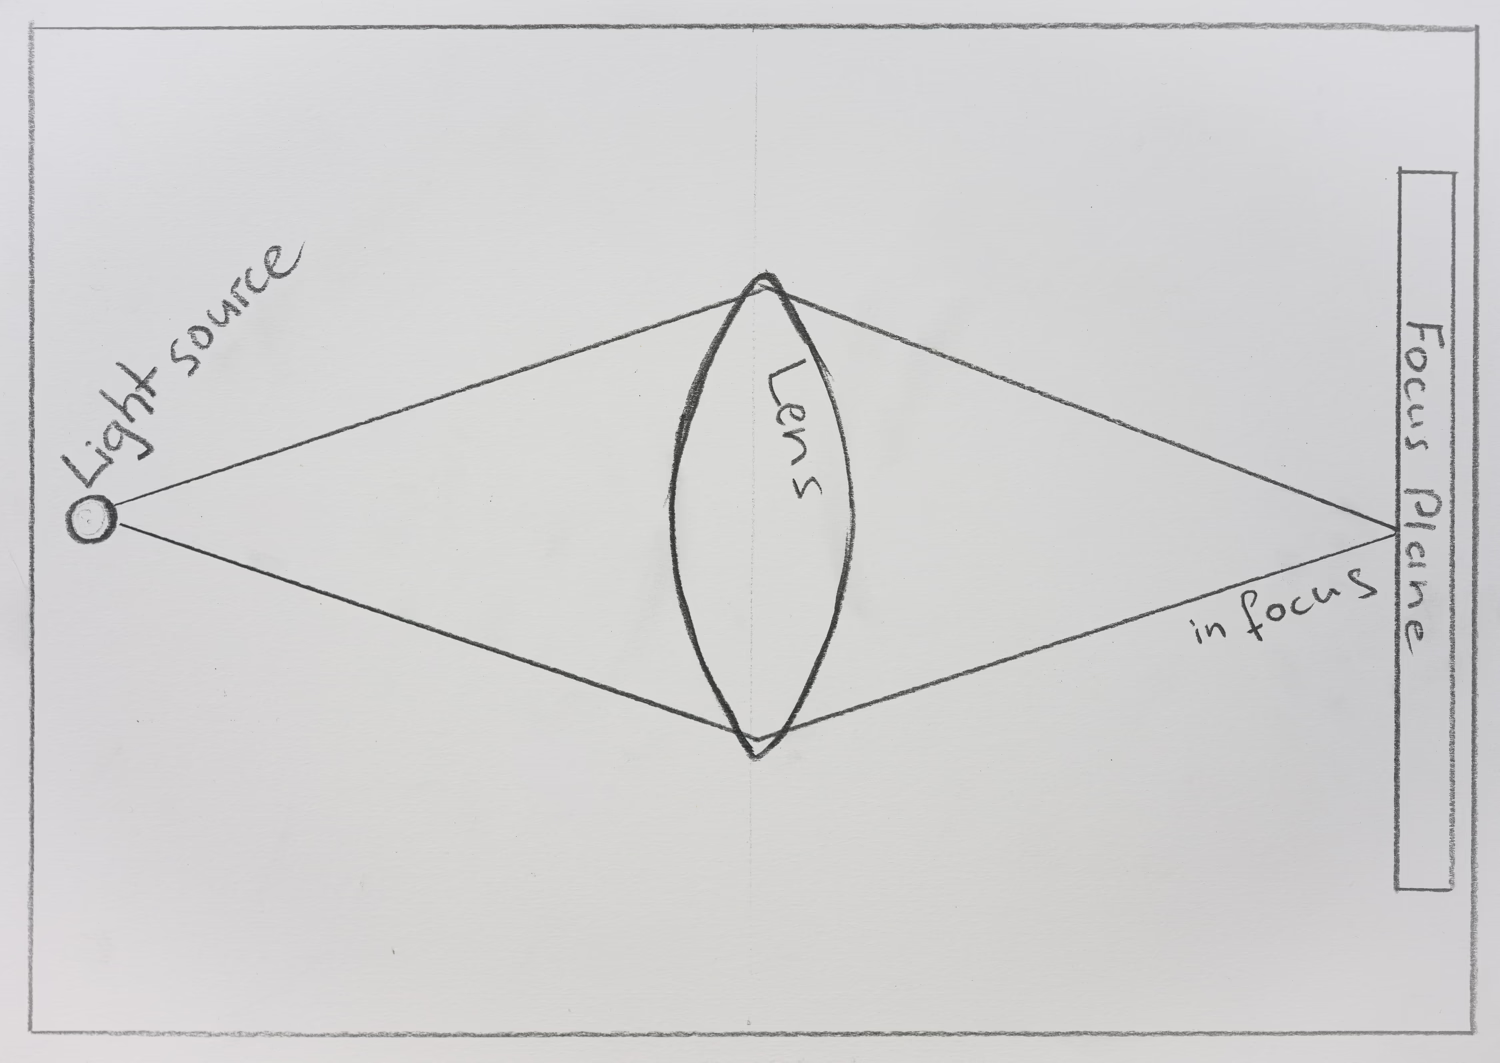
Some optical modifiers are focusable, while others aren’t. A Fresnel lens collimates light to some extent but cannot focus it. To avoid confusion between “collimating” and “focusing,” we’ve written a dedicated article on this topic. Photographers often use “focus” to describe collimation, which creates inaccuracy. We’ve decided to explicitly differentiate between the two: “collimating” brings light rays into a more parallel state, while “focusing” directs rays to converge at a specific point (like a camera lens does).

Unlike a typical Fresnel lens, a zoom spot does both—it collimates light into parallel rays and focuses it to project sharp forms, masks, or patterns. This combination enables creative possibilities:
- Creating effects by projecting forms or patterns onto subjects or backgrounds
- Lighting specific areas of a subject, like a label
- Simulating sunlight while maintaining precise control over light spread
We don’t use the first two options as they don’t fit our creative vision. We’ll focus entirely on the third option—one of our primary approachs for recreating sunlight.
Visualizing the Shot
To make this article practical, we’ll walk through lighting setup for one of our recent images. We’ll cover only lighting topics, intentionally leaving out idea development and set preparation to maintain focus.
First, let’s visualize the lighting before shooting. Our goal: recreate the subtle feel of a sunny autumn day. The sun is direct but not powerful. It produces hard-edged shadows that are simultaneously open and distinct—a beautiful, dreamy combination between hard and soft lighting. This reminds me of trips to the Baltic Sea in late summer or early autumn.
To achieve this mood, we need precise control over every lighting aspect. The most important part is balancing the key light (acting as sunlight) with the fill light. Because the sunlight is so subtle, the fill light becomes almost a secondary key light. We want it cooler and somewhat flat to accentuate the fading power of the sun.
The Studio Setup
As discussed in previous articles, faithfully replicating sunlight requires collimating your key light source. Several methods exist: a bare bulb at great distance, a zoom reflector for moderate collimation and control, a Fresnel lens, or even a parabolic reflector. However, all these modifiers introduce the same problem—the lack of control over spill light. Even a Fresnel lens, easier to control than a bare bulb, inevitably creates light spill that makes balancing difficult. And positioning a heavy parabolic reflector or Fresnel lens overhead to simulate midday sun? Technically challenging, unsafe, and frankly exhausting to even consider.
This is where this technique shines. Remember: a zoom spot both collimates and focuses light. This allows us precisely lighting any object without affecting anything around. Using a mirror to redirect the beam, we can achieve any position imaginable, without dealing with the modifiers weight itself. The combination provides ultimate control and unrivalled flexibility.

Here’s a tip: countless cheap mirrors are available, including plastic ones that are lightweight, inexpensive, safe, and available in various sizes. However, the best mirrors are made of polished aluminum. Here in Germany they are called “Alu dibond mirror”. These plates are lightweight and, unlike plastic, maintain a perfectly flat surface even under stress. We’ve attached powerful neodymium magnets to the back and mount them on small ballheads.
Execution
With the mirror mounted, positioning becomes effortless. The zoom spot stays stationary in an accessible position while the mirror redirects the beam precisely. The heavy modifier remains safely grounded, and adjustments happen quickly by repositioning the small mirror rather than the entire fixture.

For this image, the zoom spot was set at full zoom for maximum collimation. The focused beam hit the mirror at approximately 45 degrees, directing sunlight from above onto the subject. We further refined the beam using blades to match the mirror’s form precisely, ensuring virtually no light spilled onto the background or fill setup, maintaining complete independence between light sources.

The fill light consisted of three large Lee diffusion sheets positioned left, right, and above the subject, providing cool, even illumination. With the key light isolated through the mirror technique, balancing became straightforward. Starting with the fill light at the desired exposure, we gradually increased zoom spot intensity until the sunlight effect appeared natural—present but not overpowering.
The beauty of this approach lies in precision. Small adjustments to either light source produce predictable results without affecting the other. The hard-edged shadows from the collimated zoom spot contrast beautifully with soft fill, creating that distinctive autumn sunlight quality where shadows are defined yet transparent.
Equipment

For this shoot, we used a powerful zoom spot: the Bacht ESP600 combined with a 1600Ws Broncolor power pack. We’ve used this technique many times with less advanced zoom spots and standard 500Ws flash heads. However after some testing, the large ESP600 proved to be much more efficient, overpowering our Elinchrom 18-36 degree zoom spot even at corresponding power settings. Spots with smaller lenses are even less efficient. The extra power of a power pack together with this efficiency is very welcome when using the zoom spot and a mirror as a key light because while it produces refined, natural lighting, it also consumes substantial power. Having this extra reserve in power feels very liberating. Additionally lower power settings also mean shorter flash durations that help freeze motion—very helpful for this shoot.

Final Thoughts
That covers this technique and this special modifier. In future articles, we’ll explore many more modifiers that collimate light in different ways. We will be also covering our techniques for creating natural looking fill.